
JRuby is a Java implementation of Ruby that runs atop the Java Virtual Machine. The JRuby wiki has this to say:
JRuby is a 100% Java implementation of the Ruby programming language. It is Ruby for the JVM.
JRuby provides a complete set of core “builtin” classes and syntax for the Ruby language, as well as most of the Ruby Standard Libraries. The standard libraries are mostly Ruby’s own complement of .rb files, but a few that depend on C language-based extensions have been reimplemented. Some are still missing, but we hope to implement as many as is feasible.
Since it runs on the JVM, it benefits from tooling and optimisations that are built into the Java Virtual Machine; this can lead to better performance. It also provides us a way for us to call Java classes and libraries from our Ruby programs.
JRuby 10 is a massive update, if you’ve been following the developments. It jumps all the way ahead to current (for now) Ruby 3.4 support, and ups the JVM requirement to Java 21 to be able to benefit from years of development in the Java ecosystem. This post is along the same lines of the posts to install Ruby 3.4.x and JRuby 9.4 on this site.
Ok, so it’s Day 0 – the day we set up JRuby on Windows and run a simple script. We will do the following:
- Download and install JRuby on Windows
- Run a Ruby script
- Install a gem
- Set up pik for multiple JRubies
- Mapping Ruby commands to JRuby
This guide assumes that you already have Java on your PC. If you don’t, you need to set that up. This is one of the many guides on getting Java running on your PC. Note that you do need Java 21 at a minimum.
Download and install JRuby on Windows
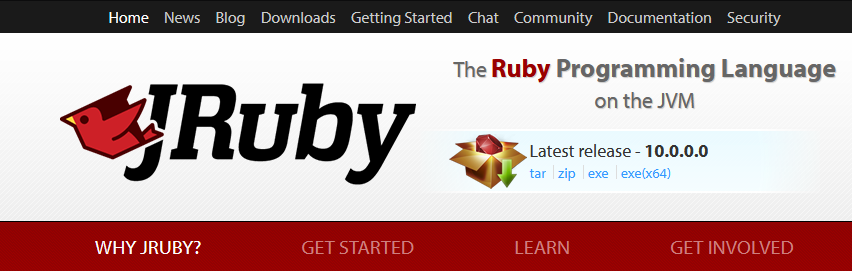
Getting JRuby running on Windows is really straighforward. Directly on the home page on the top right, you will see the links to get different packages. For Windows, you need to get one of the two exe versions:
- exe – this is the version for 32-bit Windows
- exe(x64) – this is the version for 64-bit Windows
Get the correct version (approx. 67MB) for your computer and run it. Installing JRuby requires administrator permissions to install.
Before we get started
In general, for most things, I recommend that you set the folder to be compressed automatically by Windows so that it saves you space. This becomes important especially on SSDs where the space might be limited to start with anyway. So, I create the folder in advance and mark it compressed. This step is covered in post to install Ruby 3.4.x.
Running the installer
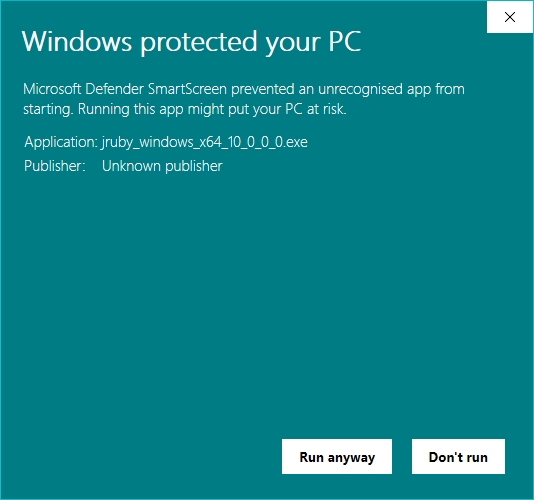
When you run it, you will see a Windows smart screen error since the installer is not signed and that can be a bit expensive. But you can trust this and Run Anyway or consider using the ZIP distribution (I might post instructions later).
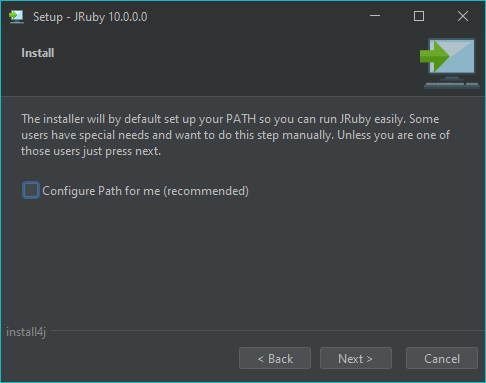
The default installation does two things:
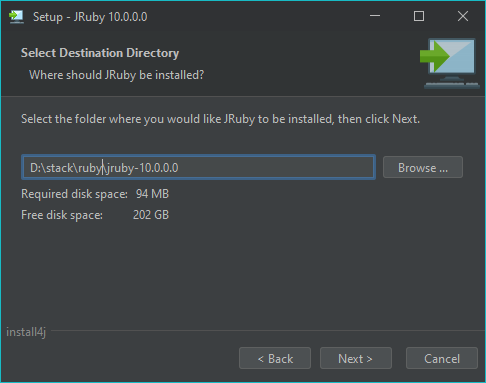
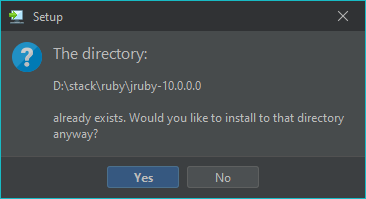
- It installs JRuby into
c:\jruby-version– as at the time of writing, it would create the directory intoc:\jruby-10.0.0.0since I’m installing version 10.0.0.0. In the screenshots below, I changed the installation path to install tod:\stack\ruby\jruby-10.0.0.0instead. - It adds this JRuby installation to the PATH on Windows. If you follow that and then open a command prompt and run
jruby -vyou would find it on the path. This time, I will not add it to the path.

The downloads page for JRuby also provides other downloads and older versions, if you need something else.
I won’t walk through the individual steps, but you are likely to see similar screens as your installation proceeds.
Running JRuby
Since I did not add it to my path, I need to do that now. I did that and it failed as below. The reason for this is that the “wrong” Java is on my path. I have Java 17 as default on my path and JRuby requires at least Java 21.
$ path
PATH=D:\stack\jdk\jdk-17.0.9+8-ms\bin;C:\Windows\system32;C:\Windows;...

$ path=d:\stack\ruby\jruby-10.0.0.0\bin;%PATH%

$ jruby -v
Error: LinkageError occurred while loading main class org.jruby.Main
        java.lang.UnsupportedClassVersionError: org/jruby/Main has been compiled by a more
        recent version of the Java Runtime (class file version 65.0), this version of the
        Java Runtime only recognizes class file versions up to 61.0
I will fix that by adding the correct Java to my path and try again.
$ set JAVA_HOME=D:\stack\jdk\jdk-21.0.5+11-ms
$ set PATH=D:\stack\jdk\jdk-21.0.5+11-ms\bin;%PATH%

$ java -version
openjdk version "21.0.5" 2024-10-15 LTS
OpenJDK Runtime Environment Microsoft-10377968 (build 21.0.5+11-LTS)
OpenJDK 64-Bit Server VM Microsoft-10377968 (build 21.0.5+11-LTS, mixed mode, sharing)

$ set path=d:\stack\ruby\jruby-10.0.0.0\bin;%PATH%
$ jruby -v
jruby 10.0.0.0 (3.4.2) 2025-04-13 6ed59bc847 OpenJDK 64-Bit Server VM 21.0.5+11-LTS on 21.0.5+11-LTS +indy +jit [x86_64-mswin32]
Great! Now it works!
There’s a lot in the version response:
- jruby 10.0.0.0
- Compatible with: 3.4.2
- Release on 2025-04-13
- Running with OpenJDK 64-Bit Server VM 21.0.5+11-LTS on 21.0.5+11-LTS
- On x86_64-mswin32 (Windows x64)
Good! With that done, we are ready to try running a simple script.
Create and run a simple script
Ok, hello world time. We all know that we just need this for the simplest Ruby script.
1
puts "Hello from Ruby #{RUBY_VERSION}"
Then, you can run this by doing:
$ jruby hello.rb
Hello from Ruby 3.4.2
If you tried both Ruby and JRuby exactly the same way, you will see the same output results (version number notwithstanding).
You will notice one thing at this point – the JRuby version takes longer to run. This is something you will hear about in every JRuby talk – startup takes a bit longer and JRuby is best (at this point) for server deployments or for desktop scripts that need to run for longer. A single-line “Hello World” is probably one of the worst things that you could use to form an opinion about JRuby’s comparitive performance. We will come back to performance in a different post.
In the short term, you can do --dev as a startup flag to get slightly better startup time. On my PC, it shaves approximately 1 – 2 seconds off the startup time without the flag. So, doing jruby --dev hello.rb is faster than just doing jruby hello.rb but for longer running processes, it’s better to start with --dev since that will prioritise eventual run-time performance.
Seeing the list of installed gems
You can list the gems like how would you do with Ruby just starting it as jruby -S gem list:
$ jruby -S gem list

*** LOCAL GEMS ***

abbrev (0.1.2)
base64 (0.2.0)
benchmark (default: 0.4.0)
bigdecimal (3.1.9 java)
bundler (default: 2.6.3)
cgi (default: 0.4.1 java)
csv (3.3.2)
date (default: 3.4.1 java)
debug (0.2.1)
delegate (default: 0.4.0)
did_you_mean (default: 2.0.0)
digest (default: 3.2.0 java)
drb (2.2.1)
english (default: 0.8.0)
erb (default: 4.0.4 java)
error_highlight (default: 0.7.0)
ffi (default: 1.17.0 java)
ffi-binary-libfixposix (default: 0.5.1.1 java)
ffi-bindings-libfixposix (default: 0.5.1.0)
fiddle (default: 1.1.6)
fileutils (default: 1.7.3)
find (default: 0.2.0)
forwardable (default: 1.3.3)
getoptlong (0.2.1)
io-console (default: 0.8.0 java)
io-wait (default: 0.3.1 java)
ipaddr (default: 1.2.7)
irb (default: 1.14.3)
jar-dependencies (default: 0.5.4)
jruby-openssl (default: 0.15.3 java)
jruby-readline (default: 1.3.7 java)
jruby-win32ole (0.8.5)
json (default: 2.9.1 java)
logger (default: 1.6.4)
matrix (0.4.2)
minitest (5.25.4)
mutex_m (0.3.0)
net-ftp (0.3.8)
net-http (default: 0.6.0)
net-imap (0.5.4)
net-pop (0.1.2)
net-protocol (default: 0.2.2)
net-smtp (0.5.0)
nkf (0.2.0 java)
observer (0.1.2)
open-uri (default: 0.5.0)
open3 (default: 0.2.1)
optparse (default: 0.6.0)
ostruct (default: 0.6.1)
power_assert (2.0.5)
pp (default: 0.6.2)
prettyprint (default: 0.2.0)
prime (0.1.3)
pstore (default: 0.1.4)
psych (default: 5.2.3 java)
racc (1.8.1 java)
rake (13.2.1)
rake-ant (default: 1.0.6)
rdoc (default: 6.10.0)
reline (default: 0.6.0)
resolv-replace (0.1.1)
rexml (3.4.0)
rinda (0.2.0)
rss (0.3.1)
ruby2_keywords (default: 0.0.5)
rubygems-update (default: 3.6.3)
securerandom (default: 0.4.1)
shellwords (default: 0.2.2)
singleton (default: 0.3.0)
stringio (default: 3.1.5 java)
strscan (default: 3.1.2 java)
subspawn (default: 0.1.1)
subspawn-posix (default: 0.1.1)
syntax_suggest (default: 2.0.2)
tempfile (default: 0.3.1)
test-unit (3.6.7)
time (default: 0.4.1)
timeout (default: 0.4.3)
tsort (default: 0.2.0)
un (default: 0.3.0)
uri (default: 1.0.3)
weakref (default: 0.1.3)
yaml (default: 0.4.0)
Installing a gem
All Ruby programmers will install and use gems. In MRI, we use gem install [gem_name] which is shortcut for running the system command gem (which could be done as ruby -S gem install [gem_name]). JRuby works exactly the same as the second way (but just with jruby instead of ruby).
The equivalent JRuby command changes gem install to jruby -S gem install and that’s all it takes. For simplicity, let’s install sinatra on JRuby and see what outputs we get.
$ jruby -S gem install --no-document sinatra
Fetching rack-protection-4.1.1.gem
Fetching tilt-2.6.0.gem
Fetching rack-3.1.13.gem
Fetching rack-session-2.1.0.gem
Fetching sinatra-4.1.1.gem
Fetching mustermann-3.0.3.gem
Successfully installed tilt-2.6.0
Successfully installed rack-3.1.13
Successfully installed rack-session-2.1.0
Successfully installed rack-protection-4.1.1
Successfully installed mustermann-3.0.3
Successfully installed sinatra-4.1.1
6 gems installed
You can see it in the gem list now.
$ jruby -S gem list sinatra

*** LOCAL GEMS ***

sinatra (4.1.1)
So, we know how to install gems now. Let’s install a gem that is very helpful on Windows.
Installing pik for multiple JRuby Installations
pik is a gem that allows you to switch between different Ruby installations on a Windows computer. Although it is no longer maintained according to the github page, I found that it still works fine for me. It also works with JRuby by updating the PATH and other variables.
Open a command prompt that has JRuby on the path and do the equivalent of gem install pik
$ jruby --dev -S gem install pik
Fetching pik-0.2.8.gem

----------------------------------------------------------------------------

*  If you're upgrading from a version <= 0.1.1, you'll want to delete the pik.bat file
   from all of your ruby versions. Gem uninstall should do the trick.

*  Install pik to a location that's in your path, but someplace other than your ruby\bin dir
   If you're upgrading from a more recent version, pik_install will overwrite the older files as needed.

    >path
      PATH=C:\tools\;C:\ruby\186-p368-mingw32\bin;C:\WINDOWS\system32;C:\WINDOWS

    >pik_install C:\tools

*  If this is a first-time install, add all the versions of ruby that you want to use with pik

    >pik add
    Adding:  186: ruby 1.8.6 (2009-03-31 patchlevel 368) [i386-mingw32]
     Located at:  c:/ruby/186-p368-mingw32/bin

    >pik add C:\ruby\IronRuby-091\bin
    Adding:  091: IronRuby 0.9.1.0 on .NET 2.0.0.0
     Located at:  C:/ruby/IronRuby-091/bin

    >pik add C:\ruby\jruby-1.4.0RC1\bin
    Adding:  140: jruby 1.4.0RC1 (ruby 1.8.7 patchlevel 174) (2009-09-30 80c263b) (Java HotSpot(TM) Client VM 1.6.0_14) [x86-java]
     Located at:  C:/ruby/jruby-1.4.0RC1/bin


----------------------------------------------------------------------------

Successfully installed pik-0.2.8
1 gem installed
Once this is done, you need to add the current installation to your pik (adjust the path to your JRuby executable).
$ pik add d:\jruby-10.0.0.0\bin
Currently, this will fail! There is an issue in pik that results in it failing to decode the version correctly for JRuby 10. In my case, I was able to work around it by going to my %HOME%/.pik directory and opening config.yml and adding this into it.
"100: jruby 10.0.0.0 (3.4.2) 2025-04-13 6ed59bc847 OpenJDK 64-Bit Server VM 21.0.5+11-LTS on 21.0.5+11-LTS +indy +jit [x86_64-mswin32]":
  :path: !ruby/object:Pathname
    path: D:/stack/ruby/jruby-10.0.0.0/bin
After this, you should be able to see something like this on the command line.
$ pik jr
Select which Ruby you want:
1. 921: jruby 9.2.13.0 (2.5.7) 2020-08-03 9a89c94bcc OpenJDK 64-Bit Server VM 25.265-b01 on 1.8.0_265-b01 +jit [mswin32-x86_64]
2. 932: jruby 9.3.2.0 (2.6.8) 2021-12-01 0b8223f905 OpenJDK 64-Bit Server VM 25.265-b01 on 1.8.0_265-b01 +jit [mswin32-x86_64]
3. 946: jruby 9.4.6.0 (3.1.4) 2024-02-20 576fab2c51 OpenJDK 64-Bit Server VM 25.265-b01 on 1.8.0_265-b01 +jit [x86_64-mswin32]
4. 928: jruby 9.2.18.0 (2.5.8) 2021-06-08 d67cb7d6e0 OpenJDK 64-Bit Server VM 25.265-b01 on 1.8.0_265-b01 +jit [mswin32-x86_64]
5. 100: jruby 10.0.0.0 (3.4.2) 2025-04-13 6ed59bc847 OpenJDK 64-Bit Server VM 21.0.5+11-LTS on 21.0.5+11-LTS +indy +jit [x86_64-mswin32]
?
Enter a number to switch to that JRuby. The next time you do a > jruby -S gem list it will use that JRuby.
You can also list all installed Ruby versions by doing:
$ pik list
* 100: jruby 10.0.0.0 (3.4.2) 2025-04-13 6ed59bc847 OpenJDK 64-Bit Server VM 21.0.5+11-LTS on 21.0.5+11-LTS +indy +jit [x86_64-mswin32]
  187: ruby 1.8.7 (2013-06-27 patchlevel 374) [i386-mingw32]
  193: ruby 1.9.3p551 (2014-11-13) [i386-mingw32]
  224: ruby 2.2.4p230 (2015-12-16 revision 53155) [x64-mingw32]
  266: ruby 2.6.8p205 (2021-07-07 revision 67951) [x64-mingw32]
  274: ruby 2.7.4p191 (2021-07-07 revision a21a3b7d23) [x64-mingw32]
  300: ruby 3.0.3p157 (2021-11-24 revision 3fb7d2cadc) [x64-mingw32]
  311: ruby 3.1.1p18 (2022-02-18 revision 53f5fc4236) [x64-mingw-ucrt]
  320: ruby 3.2.0 (2022-12-25 revision a528908271) [x64-mingw-ucrt]
  330: ruby 3.3.0 (2023-12-25 revision 5124f9ac75) [x64-mingw-ucrt]
  341: ruby 3.4.1 (2024-12-25 revision 48d4efcb85) +PRISM [x64-mingw-ucrt]
  921: jruby 9.2.13.0 (2.5.7) 2020-08-03 9a89c94bcc OpenJDK 64-Bit Server VM 25.265-b01 on 1.8.0_265-b01 +jit [mswin32-x86_64]
  928: jruby 9.2.18.0 (2.5.8) 2021-06-08 d67cb7d6e0 OpenJDK 64-Bit Server VM 25.265-b01 on 1.8.0_265-b01 +jit [mswin32-x86_64]
  932: jruby 9.3.2.0 (2.6.8) 2021-12-01 0b8223f905 OpenJDK 64-Bit Server VM 25.265-b01 on 1.8.0_265-b01 +jit [mswin32-x86_64]
  946: jruby 9.4.6.0 (3.1.4) 2024-02-20 576fab2c51 OpenJDK 64-Bit Server VM 25.265-b01 on 1.8.0_265-b01 +jit [x86_64-mswin32]
This site has a separate page on how to use pik if you want to know more.
Mapping the Ruby commands to JRuby
The short rule is this: irb is jirb, the rest are jruby -S command. Some of this is from https://github.com/jruby/jruby/wiki/GettingStarted#running-rake-gem-rails-etc
Note: that’s an upper-case “S” – you can potentially spend a lot of time wondering why a lower case “s” does not behave properly (don’t ask me how I know).
This simply gives us this:
| Ruby Command | JRuby Command |
|---|---|
| irb | jirb |
| gem install | jruby -S gem install |
| gem list | jruby -S gem list |
| rails new project | jruby -S rails new project |
| bundle install | jruby -S bundle install |
What about Bundler?
Keep in mind that bundler needs to be installed before that last command runs. JRuby comes with bundler (default: 2.6.3) but you can install the latest bundler by doing @jruby -S gem install bundler as always.
If you use bundler and look at the Gemfile.lock, you should see something like this in the file which shows you that it’s JRuby (actually, Java)
PLATFORMS
  java
What’s next?
A good next post to read looks at running scripts and migrating to JRuby fromm Ruby. Also, check out other JRuby-related posts that are linked from my post on why I like using JRuby.
Links and References
Here are the main links:
- JRuby Website: https://www.jruby.org/
- Download JRuby: https://www.jruby.org/download
- Getting started pages from the wiki: https://github.com/jruby/jruby/wiki/GettingStarted
- The wiki is at: https://github.com/jruby/jruby/wiki
- Other Walkthroughs and Tutorials: https://github.com/jruby/jruby/wiki/WalkthroughsAndTutorials
OK, so we have done enough for Day 0 – we know how to install JRuby, run a script with JRuby, install gems directly, switch between different JRuby installation, and also use Bundler. We are ready for more!