
Ruby is a dynamic, open source programming language with a focus on simplicity and productivity. It has an elegant syntax that is natural to read and easy to write (from the Ruby web site). On Christmas Day 2025, as is tradition now, the core team released version 4.0 – the next major version with ZJIT (not available on Windows yet) and experimental support for Ruby Box alongside other improvements and features – that has been in development for some time and replace the working version “Ruby 3.5”. The Windows RubyInstaller site has just added Ruby 4.0 to its downloads page, so let’s get it up and running.
This post will help you get started with Ruby 4.0 on Windows, and covers the basics of installation. This post is along the same lines of the post to install Ruby 3.4.x or to install even older versions such as Ruby 3.3.x / Ruby 3.2.x | Ruby 3.1.x | Ruby 3.0.x and so on. There is one difference, though, this year – I am writing this on a Windows 11 computer, so there might be some subtle Windows differences!
Do note that support has ended for Ruby versions up to and including Ruby 3.1 and support for Ruby 3.2 will end in March 2026. So, it’s a good idea to move to a newer Ruby sooner rather than later!
Note: This post was written for Ruby 4.0 but should work for other versions also, especially minor versions.
As you know, there are a few ways to run Linux or similar (containers, Windows Subsystem for Linux, or Virtual Machines) on Windows and of course, each of those has its own way to support Ruby “under Windows”. However, we want to focus more on the most direct and native way to run Ruby on Windows, so we will use the RubyInstaller.
Ok, so it’s Day 0 – the day we set up Ruby on Windows and run a simple script. We will do the following:
- Download and install Ruby 4.0 on Windows
- Run a Ruby script
- Install a gem
- Set up pik for multiple Ruby versions
Before we get started
A full Ruby installation, as we intend to do, will take upwards of approximately 900MB of disk space. I recommend that you set the folder to be compressed automatically by Windows so that it saves you space. This becomes important especially on SSDs where the space might be limited to start with anyway (and with the current increase in prices, all the more!)
A quick note on the path: I would strongly recommend that you install Ruby to a directory that has no spaces in the path. Some of the tools have problems compiling extensions when there are spaces in the path. So, it’s much better to install to C:\Ruby40-x64 or C:\Users\JSmith\Ruby40-x64 rather than C:\Users\John Smith\Ruby40-x64.
You can do this step after you finish the installation but it takes much longer than doing it now when the folder is empty so that Windows will automatically compress the files on the fly as they get written to the directory as part of the installation.
So, this is what you need to do. In my case, I will use the directory path d:\stack\ruby\Ruby40-x64 and all screenshots will show that. Adjust accordingly if you use something like C:\Ruby40-x64 for your installation.
- First, I create the folder
Ruby40-x64under thed:\stack\rubypath – this is where I will install Ruby 4.0 - In Explorer then, right click on the new folder and click Properties which brings up a menu like the one you see below.
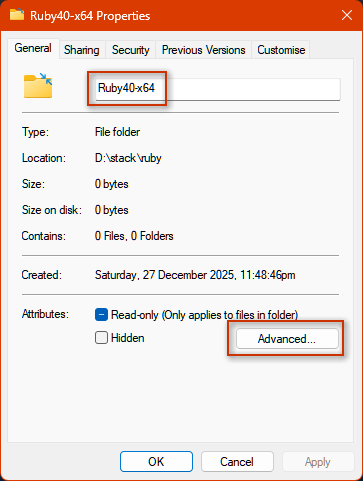
- Click on Advanced… which brings up the ‘Advanced Attributes’ menu.

- Check the setting for ‘Compress contents to save disk space’ – this will ensure that the file in this folder are compressed on the disk and will save you a lot of space on the installation. At the end of the installation, we will see how much!
Uninstalling an Older Version (optional)
Do you want to uninstall an older Ruby version? There are instructions on this page should you want to. If you need to run multiple versions of Ruby on the same PC, it’s not a problem if you use something like pik that we also discuss below.
Download and install Ruby on Windows
Head on over to the RubyInstaller Downloads site and grab the package for rubyinstaller-devkit-3.4.1-1-x64 (it’s approximately 138MB). Previously, there used to be 32-bit versions, but now, you’ll see that there are only ARM or x64 versions. I am on a 64-bit Windows PC, so I am going to get the x64 package. I don’t have experience with Windows on ARM yet (I don’t have any such machine) but it probably works the same way. For widest compatibility with all types of gems including C native extensions, you should get the ‘Ruby+Devkit’ package though if you only want the Ruby runtime, the package without Devkit (listed further down) would also work. I would recommend getting the package with Devkit. The screenshot below shows the different items listed on the page.

Run the dowloaded file. It may ask if you intend to install for all users or only for yourself. In my case, I just install for all users. You may then be presented with a screen asking if you intend to install this software. Expand the details and agree to proceed.
Note: The certificate used to sign the installer should show Lars Kanis. If it does, it is fine. Currently, it costs much more to get a different certificate that would result in this screen not being shown. Alternatives are being explored but you can trust this.
Read and accept the license and click Next.

This takes us to the next page and asks us for the path, whether it should add Ruby to our system path and if it should associate Ruby files with this installation. I personally prefer to uncheck the second option so that I have more choice in which Ruby version runs the script. Ensure that the path shown matches the folder that we had set to be compressed. Adding it to the system path has the effect that when you open a new command window, it will directly use the newer version. If you don’t really care which Ruby version you are using, then it may be better to let the installer add it to your path so that by default, you continue to use the latest version.

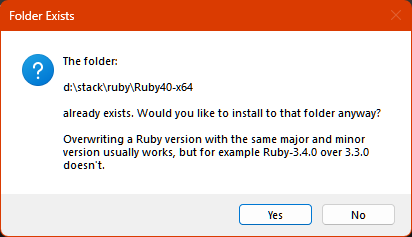
Since we created the folder before the installation (to set the attribute for compressing it), the Ruby installer will warn you that the folder already exists and will ask to confirm that it is OK to proceed. Our folder is empty and it is OK to go ahead! Click Yes.
In general, it is a good idea to install all these components since it makes the documentation available to you offline, and also prepares the MSYS2 development toolchain which is needed for compiling native gems. Select everything and click Next.

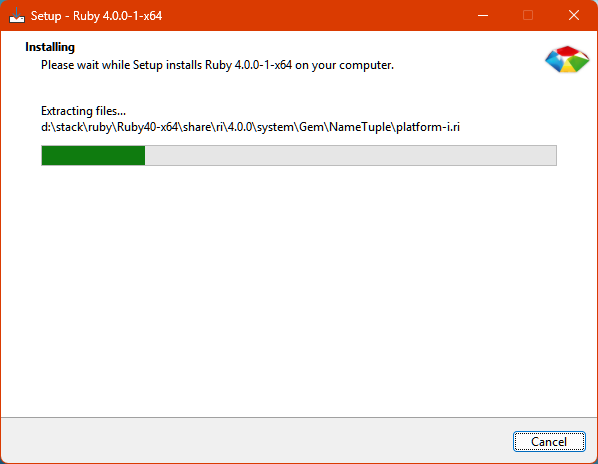
You will next see a lot of files being installed – just let that go ahead. Depending on your computer, this will take up to a few minutes.
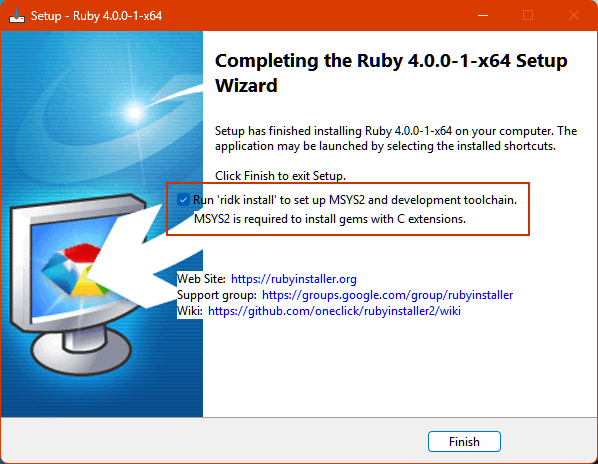
This finally comes to the screen that tells you that the main installation is done and the next step is to move on to the MSYS2 Setup. Check the option to ‘Run ridk install’ so that it can proceed and click ‘Finish’. Note also the important links that are shown here.
This then brings us the Command Line based installation for the MSYS2 toolchain. I would recommend that you either choose 1,2,3 or just use the default 1,3 at this stage.
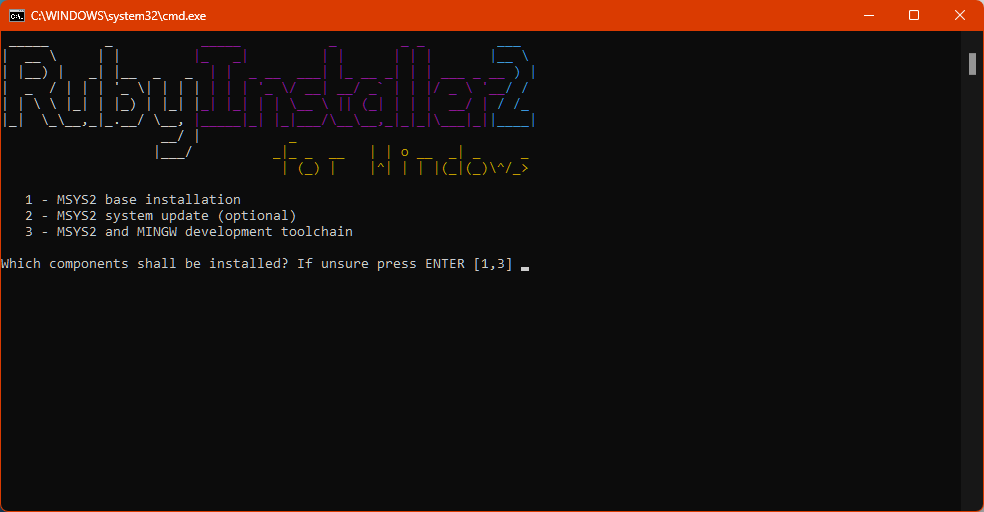
Eventually, it comes to the prompt below and just press ENTER at this stage again.

The installer will exit now and we are good to get started.
Is it all there?
Since the installation is all done, you should be able to open a new Command Line Prompt and type ruby -v to see it run. This will just work if you added it to your PATH in the earlier option. If you did not, you will need to add it to your PATH by doing PATH=D:\stack\ruby\Ruby40-x64\bin;%PATH% (use the correct path to where you installed it, by adding \bin to the end).
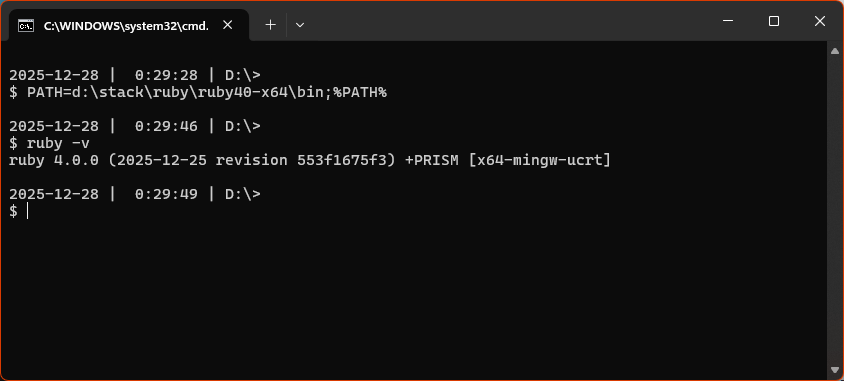
So, yes, we have Ruby 4.0.0 on our computer now. We also installed everything to D:\stack\ruby\Ruby40-x64 and can go and take a look at the files and folders there. Talking about that folder, you can now right click on that folder and check properties again. The exact numbers might be different, but you will likely see something like this. On my computer, the actual file sizes are approximately 1.19GB but on disk, it’s only taking 635MB – so, I saved more than 550MB by setting the folder to be compressed. Also, since this is applied to all the files and folders, as you install more gems, those will also be automatically compressed and will continue to take up lesser disk space.

Hello, World!
Let’s write the simplest Hello World program and save it to a file called hello.rb.
1
puts "Hello from Ruby #{RUBY_VERSION}"
Then, you can run this by doing:
$ ruby hello.rbUsing Interactive Ruby
Next, you can start up Interactive Ruby and try something in it to see it work.
$ irb
irb(main):001>
irb(main):002> puts RUBY_VERSION
4.0.0
=> nil
irb(main):003> 3.times {puts "Welcome."}
Welcome.
Welcome.
Welcome.
=> 3
irb(main):004> puts "Rocking it on #{RUBY_VERSION}"
Rocking it on 4.0.0
=> nil
irb(main):005> exit
Working with gems
All Ruby programmers will install and use gems. In Ruby, we use gem install [gem_name] which is shortcut for running the system command gem (which could be done as ruby -S gem install [gem_name]).
You can check the version of gem as below.
$ gem -v
4.0.3
Gems already installed
A lot of gems are installed as part of the Ruby installation. Do the following to see the list. It should show you something like the list below.
$ gem list

*** LOCAL GEMS ***

abbrev (0.1.2)
base64 (0.3.0)
benchmark (0.5.0)
bigdecimal (4.0.1)
bundler (default: 4.0.3)
csv (3.3.5)
...
weakref (default: 0.1.4)
win32-registry (default: 0.1.2)
win32ole (1.9.2)
yaml (default: 0.4.0)
zlib (default: 3.2.2)
You will note that importantly bundler is installed and you will often use that when you start working seriously with Ruby.
Installing a gem
Let’s install a gem into our new Ruby 4.0 install. You can skip this is you are not keen. For simplicity, we will install sinatra which is a web development framework.
$ gem install sinatra
Fetching tilt-2.6.1.gem
Using rubygems directory: C:/Users/Mohit/.local/share/gem/ruby/4.0.0
Successfully installed tilt-2.6.1
Fetching rack-3.2.4.gem
Successfully installed rack-3.2.4
Fetching base64-0.3.0.gem
Successfully installed base64-0.3.0
Fetching rack-session-2.1.1.gem
Successfully installed rack-session-2.1.1
Fetching logger-1.7.0.gem
Successfully installed logger-1.7.0
Fetching rack-protection-4.2.1.gem
Successfully installed rack-protection-4.2.1
Fetching ruby2_keywords-0.0.5.gem
Successfully installed ruby2_keywords-0.0.5
Fetching mustermann-3.0.4.gem
Successfully installed mustermann-3.0.4
Fetching sinatra-4.2.1.gem
Successfully installed sinatra-4.2.1
Parsing documentation for tilt-2.6.1
Installing ri documentation for tilt-2.6.1
Parsing documentation for rack-3.2.4
Installing ri documentation for rack-3.2.4
Parsing documentation for base64-0.3.0
Installing ri documentation for base64-0.3.0
Parsing documentation for rack-session-2.1.1
Installing ri documentation for rack-session-2.1.1
Parsing documentation for logger-1.7.0
Installing ri documentation for logger-1.7.0
Parsing documentation for rack-protection-4.2.1
Installing ri documentation for rack-protection-4.2.1
Parsing documentation for ruby2_keywords-0.0.5
Installing ri documentation for ruby2_keywords-0.0.5
Parsing documentation for mustermann-3.0.4
Installing ri documentation for mustermann-3.0.4
Parsing documentation for sinatra-4.2.1
Installing ri documentation for sinatra-4.2.1
Done installing documentation for tilt, rack, base64, rack-session, logger, rack-protection, ruby2_keywords, mustermann, sinatra after 9 seconds
9 gems installed
So, we know how to install gems now. Let’s install a gem that is very helpful on Windows.
Installing pik when using multiple Ruby Installations
pik is a gem that allows you to switch between different Ruby installations on a Windows computer. Although it is no longer maintained according to the github page, I found that it still works fine for me. It also works with JRuby (not just Ruby) by updating the PATH and other variables.
Open a command prompt that has Ruby 4.0 on the path and do gem install pik
$ gem install pik
Fetching pik-0.2.8.gem
Using rubygems directory: C:/Users/Mohit/.local/share/gem/ruby/4.0.0

----------------------------------------------------------------------------

*  If you're upgrading from a version <= 0.1.1, you'll want to delete the pik.bat file
   from all of your ruby versions. Gem uninstall should do the trick.

*  Install pik to a location that's in your path, but someplace other than your ruby\bin dir
   If you're upgrading from a more recent version, pik_install will overwrite the older files as needed.

    >path
      PATH=C:\tools\;C:\ruby\186-p368-mingw32\bin;C:\WINDOWS\system32;C:\WINDOWS

    >pik_install C:\tools

*  If this is a first-time install, add all the versions of ruby that you want to use with pik

    >pik add
    Adding:  186: ruby 1.8.6 (2009-03-31 patchlevel 368) [i386-mingw32]
     Located at:  c:/ruby/186-p368-mingw32/bin

    >pik add C:\ruby\IronRuby-091\bin
    Adding:  091: IronRuby 0.9.1.0 on .NET 2.0.0.0
     Located at:  C:/ruby/IronRuby-091/bin

    >pik add C:\ruby\jruby-1.4.0RC1\bin
    Adding:  140: jruby 1.4.0RC1 (ruby 1.8.7 patchlevel 174) (2009-09-30 80c263b) (Java HotSpot(TM) Client VM 1.6.0_14) [x86-java]
     Located at:  C:/ruby/jruby-1.4.0RC1/bin


----------------------------------------------------------------------------

Successfully installed pik-0.2.8
Parsing documentation for pik-0.2.8
Installing ri documentation for pik-0.2.8
Done installing documentation for pik after 1 seconds
1 gem installed
The first time you ever use pik on a computer, you will need to install it to a folder that is on your PATH other than the bin folder of any Ruby installation. Two common options are to install it to c:\windows\System32 (you will need to use an adminstrator command prompt for that) or to create a folder such as d:\tools for dropping executables of this kind and adding that folder to your system path. If you need help with any of these steps, just ask below and I will add the information here. Whichever folder you choose, do as shown below (but replace D:\tools with the actual directory)
>pik_install D:\toolsNext, you add the current Ruby that is on the path by doing pik add as below.
$ pik add
** Adding:  400: ruby 4.0.0 (2025-12-25 revision 553f1675f3) +PRISM [x64-mingw-ucrt]
 Located at:  D:\stack\ruby\ruby40-x64\bin
Alternatively, you can add by using the full path to the Ruby installation bin folder as shown below.
$ pik add D:\Ruby40-x64\binFinally, to see all the Ruby installations that you have, just do pik list and you should get a list of Ruby versions that you have added. My list is shown below.
$ pik list
  100: jruby 10.0.0.0 (3.4.2) 2025-04-13 6ed59bc847 OpenJDK 64-Bit Server VM 21.0.5+11-LTS on 21.0.5+11-LTS +indy +jit [x86_64-mswin32]
  187: ruby 1.8.7 (2013-06-27 patchlevel 374) [i386-mingw32]
  193: ruby 1.9.3p551 (2014-11-13) [i386-mingw32]
  224: ruby 2.2.4p230 (2015-12-16 revision 53155) [x64-mingw32]
  266: ruby 2.6.8p205 (2021-07-07 revision 67951) [x64-mingw32]
  274: ruby 2.7.4p191 (2021-07-07 revision a21a3b7d23) [x64-mingw32]
  300: ruby 3.0.3p157 (2021-11-24 revision 3fb7d2cadc) [x64-mingw32]
  311: ruby 3.1.1p18 (2022-02-18 revision 53f5fc4236) [x64-mingw-ucrt]
  320: ruby 3.2.0 (2022-12-25 revision a528908271) [x64-mingw-ucrt]
  330: ruby 3.3.0 (2023-12-25 revision 5124f9ac75) [x64-mingw-ucrt]
  341: ruby 3.4.1 (2024-12-25 revision 48d4efcb85) +PRISM [x64-mingw-ucrt]
* 400: ruby 4.0.0 (2025-12-25 revision 553f1675f3) +PRISM [x64-mingw-ucrt]
  921: jruby 9.2.13.0 (2.5.7) 2020-08-03 9a89c94bcc OpenJDK 64-Bit Server VM 25.265-b01 on 1.8.0_265-b01 +jit [mswin32-x86_64]
  928: jruby 9.2.18.0 (2.5.8) 2021-06-08 d67cb7d6e0 OpenJDK 64-Bit Server VM 25.265-b01 on 1.8.0_265-b01 +jit [mswin32-x86_64]
  932: jruby 9.3.2.0 (2.6.8) 2021-12-01 0b8223f905 OpenJDK 64-Bit Server VM 25.265-b01 on 1.8.0_265-b01 +jit [mswin32-x86_64]
  946: jruby 9.4.6.0 (3.1.4) 2024-02-20 576fab2c51 OpenJDK 64-Bit Server VM 25.265-b01 on 1.8.0_265-b01 +jit [x86_64-mswin32]
I seem to have quite a few! You can switch between versions by doing something like pik 330 or pik 400 and so on – basically use the 3 digit code that it shows on the line at the start.
What’s next?
You’re ready to use Ruby 4.0 on Windows – enjoy!
Links and References
Here are the main links:
- Ruby website: https://www.ruby-lang.org/en/
- RubyInstaller Website: https://rubyinstaller.org/
- Download RubyInstaller for Windows: https://rubyinstaller.org/downloads/
- RubyInstaller Google Group: https://groups.google.com/g/rubyinstaller?pli=1
- Wiki: https://github.com/oneclick/rubyinstaller2/wiki
OK, so we have done enough for Day 0 – we know how to install Ruby, run a script, install gems directly and switch between different Ruby installations. We are ready for more! If you found this post useful or would like to add more thoughts, feel free to share the post (you can tag me as @onghu on X or on Mastodon as @onghu@ruby.social or @onghu.com on Bluesky to discuss).